
Good clinical photography does not depend only on a sophisticated camera.
To document a case with quality, it is necessary to control equipment, lighting, exposure, framing and standardization. These factors are precisely the ones that the literature highlights as fundamental to obtain reproducible and useful clinical images for documentation and evaluation. (ONG et al., 2022; SNOW, 2005).
For a structure dedicated to clinical photography, the basic set is:
Camera body
A DSLR or mirrorless allows for greater manual control over the exposure and playback of images.
Macro lens
A lens in the range of 90–105 mm is traditionally recommended for dental photography because it offers good working distance and reduces perspective distortions. (fan, 1998).
Macro flash
Ring flash or twin flash are used to produce controlled and consistent illumination within the oral cavity. (ONG et al., 2022). Intraoral mirrors
Fundamental for occlusal photographs and certain side views.
Distractors
They allow to properly expose the tissues and keep the visual field free.
Neutral background
Especially important in extraoral photographs.
Equipment should serve standardization-not the other way around.
And it doesn't mean that smartphones are useless: recent studies show promising results when there are proper optical zoom, illumination and color calibration, although professional cameras still have advantages in more demanding clinical situations. (LI et al., 2026).
If you shoot in manual mode, three parameters determine much of the exposure:
Controls sensor sensitivity.
For clinical photography with good lighting, it is worth working with ISO low whenever possible, reducing noise and preserving detail.
Controls exposure time.
In intraoral photography with flash, a sufficiently high speed helps prevent movement — but must respect camera/flash synchronization speed.
Here is one of the most important settings for dental photography.
A closer aperture, such as f/16–f/22, increases the depth of field, allowing you to keep a larger area of anatomy in focus.
This is especially useful in intraoral photographs, where the depth of field is small.
The literature on dental photography systems highlights precisely the importance of controlling aperture, ISO, speed and distance to produce reproducible images. (ONG et al., 2022; FAN, 1998).
There is no universal setting, because camera, lens, and flash change the result.
But to start testing:
ISO: 100–200
Aperture: f/16–f/22
Speed: near the flash synchronization of your camera
Flash: manual/TTL according to the system used
WB: fixed, according to the light source
Then make small adjustments observing exposure, depth of field and color reproduction.
WB = White Balance.
It determines how the camera interprets neutral colors and consequently influences the entire color reproduction of the photograph.
This is especially important in dentistry.
An overly hot image can make teeth appear more yellowish.
A cold image can alter the perception of hue.
For clinical documentation, prefer consistent lighting conditions and a fixed white balance, instead of letting the camera automatically change the color interpretation between one photograph and another.
Standardization of lighting and calibration is particularly important when photography will be used for color evaluation. Recent studies show that both smartphones and professional cameras can deliver adequate results, but performance relies heavily on illumination, calibration and capture protocol.
This is one of the differences between a “pretty” photograph and a useful clinical photograph.
Before taking photos:
□ Clean and dry the area properly
□ Control saliva
□ Correctly position the retractors
□ Use the appropriate mirror for your view
□ Remove bubbles and condensation marks from the mirror
□ Adjust the position of the head
□ Center the photographed region
The literature recommends a systematic approach precisely because intraoral photography involves specific challenges: mobile tissues, saliva, blood, limited access and different lighting needs. (ONG et al., 2022).
Photography starts before the click.
If you want to evaluate progress, it's not enough to have good photographs.
You need to have comparable photographs.
Keep, as much as possible:
the same camera;
same lens;
same distance;
same framing;
same head position;
same lighting;
same exposure;
same sequence.
An intraoral documentation may include, for example:
frontal → right lateral → left lateral → upper occlusal → lower occlusal → case-specific details.
This standardization allows changes observed between different times to be attributed to the treatment, and not simply to changes in the way the photograph was taken. (BENGEL, 1985; MARCATO; SANDLER, 2018).
An efficient clinical photographic documentation does not depend on photographing everything.
It depends on photographing which allows to understand and follow the case.
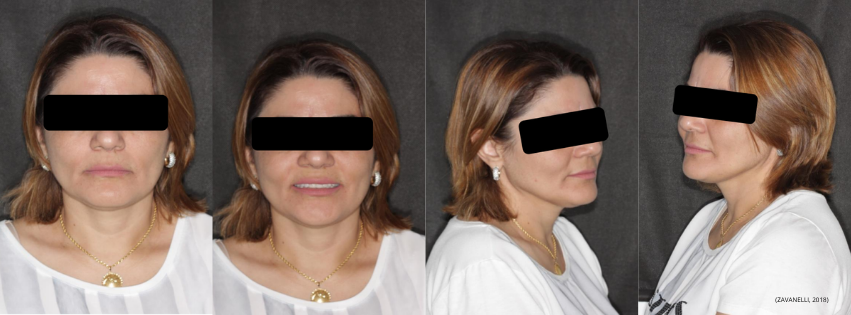
For basic and standardized dental documentation, it is worth establishing a fixed sequence of extraoral and intraoral records. Standardization allows images to be compared throughout the treatment and reduces differences caused by positioning, framing and perspective (BENGEL, 1985; ONG et al., 2022).
Dental and maxillofacial photography protocols recommend different facial views precisely to allow more consistent three-dimensional documentation of the face (BENGEL, 1985; ETTORRE et al., 2006).
Frontal at rest: Patient facing forward, head in natural position, lips at rest.
To observe: facial proportions, symmetry and reference facial features.
Frontal smiling: Same positioning, now with a spontaneous smile or according to the chosen protocol.
To observe: tooth exposure, smile line, buccal corridors and relationship between teeth and face.
Right and left profile: Patient in lateral position, keeping the head standardized.
To observe: facial profile, relationship between soft tissues and characteristics that may be relevant for planning.
Here is the core ofdental documentation.
Registers: anterior relationship, midline, overbite, anterior teeth and visible gingival tissues.
Side views are important because a frontal photograph does not adequately assess posterior relationships.
Records: arch shape, tooth positioning, palate and aspects of the gingival tissue.
These five views — frontal + two lateral + two occlusal — are described in the literature as a key set for documenting intraoral status (BENGEL, 1985).
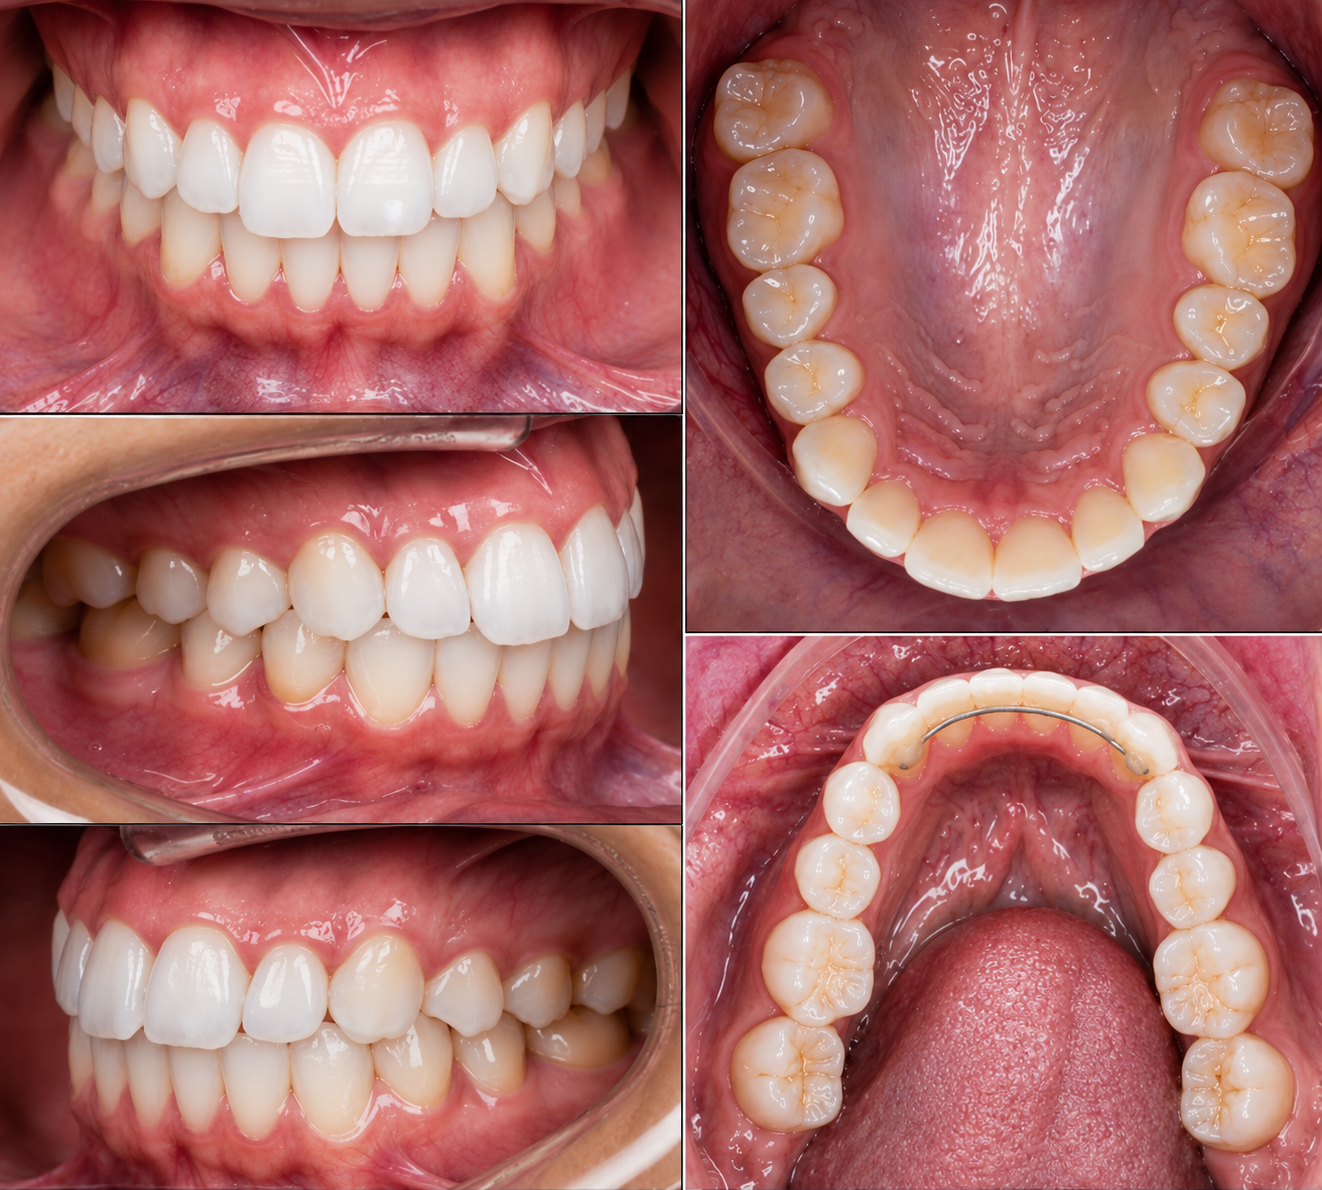
(DALAFINI; VINHA; SANTOS, 2022).
The five basic views need not be the limit.
Add specific photographs when they answer a clinical question.
For example:
Periodontics → details of the gingival margin, recessions and peri-implant tissues.
Dentistry/Prosthetics → texture, translucency, characterization, preparation and surface details.
Implantology → edentulous region, soft tissues, emergence profile and site-specific records.
Orthodontics → additional photographs related to occlusion and facial features.
Harmonization/aesthetics → additional facial and smile records, according to the objective of the documentation.
Clinical photography should be adapted to the question the case needs to answer, and not simply increase the number of images.
□ Frontal resting
□ Frontal smiling
□ Right profile
□ Left profile
□ 45° — when necessary
□ Frontal
□ Right lateral
□ Left lateral
□ Upper occlusal
□ Lower occlusal
□ Details related to the case
It is not enough to repeat the positions.
Repeat the conditions.
Same head position.
Same framing.
Same distance.
Same lighting.
Same sequence.
Thus, when you compare the initial case with the follow-up, the observed difference will be much more likely to represent a real clinical change, and not a change in photography (CLAMAN; PATTON; RASHID, 1990).
The best photographic protocol is the one you can repeat.
DALAFINI, Lucas Medeiros; VINHA, Thais da Costa; SANTOS, Andrezza Cristina Moura. The importance of digital photography for diagnosis and improvement of techniques in dental procedures. Unilago Scientific Magazine, v. 1, no. 1, p. 1-9, 2022
CANDIL, Leticia Bizzi. Photographic protocol for aesthetic treatment. Araçatuba: Universidade Estadual Paulista “Júlio de Mesquita Filho”, 2020.
BENGEL, Wolfgang. Standardization in dental photography. International Dental Journal, v. 35, n. 3, p. 210-217, 1985.
CLAMAN, L.; PATTON, D.; RASHID, R. Standardized portrait photography for dental patients. American Journal of Orthodontics and Dentofacial Orthopedics, v. 98, n. 3, p. 197-205, 1990. DOI: 10.1016/S0889-5406(05)81596-3.
ETTORRE, Giovanni et al. Standards for digital photography in cranio-maxillo-facial surgery – Part I: Basic views and guidelines. Journal of Cranio-Maxillofacial Surgery, v. 34, n. 2, p. 65-73, 2006. DOI: 10.1016/j.jcms.2005.11.002.
NGO, Jun Ming Darrell et al. A standardized approach to extra-oral and intra-oral digital photography. Journal of Visualized Experiments, n. 185, 2022. DOI: 10.3791/63627.
Explore outros conteúdos, aprofunde seus conhecimentos e descubra novas possibilidades para sua carreira.